How to Add Velocity in CapCut (2026)
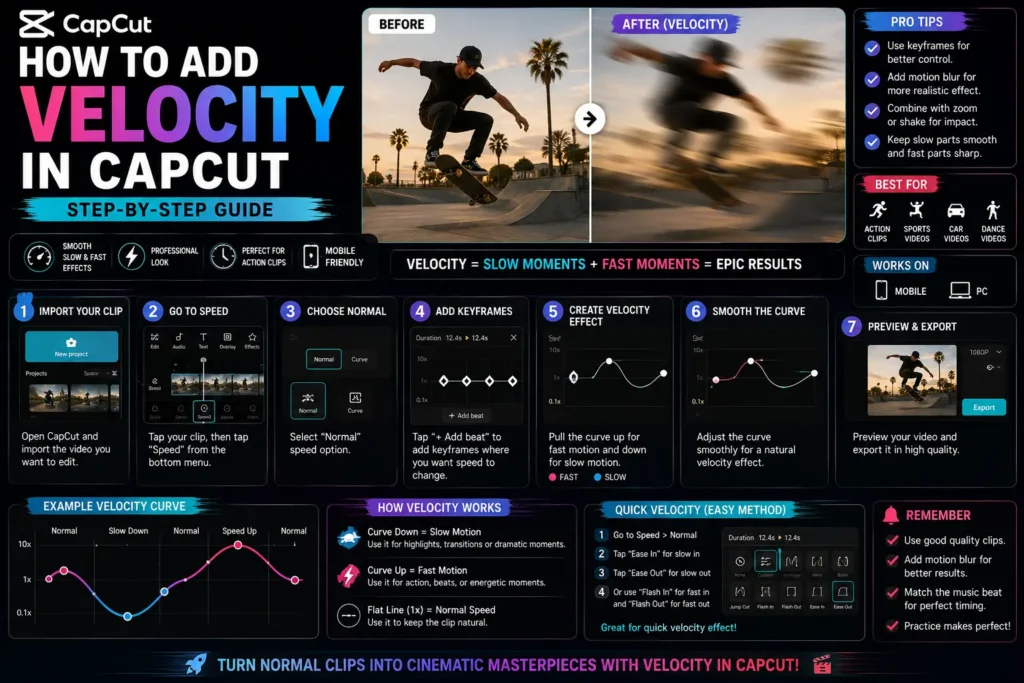
Velocity editing lets you speed up or slow down different parts of a single clip smoothly and precisely, rather than changing the speed of the whole clip uniformly — this is what makes speed ramps, cinematic slow-motion emphasis, and beat-synced speed changes possible.
What Makes Velocity Different From a Flat Speed Change
A basic speed adjustment changes the pace of an entire clip uniformly. Velocity lets you set different speeds at different points along the same clip’s timeline — a section can play normally, then slow dramatically, then speed back up, all within one continuous clip rather than requiring multiple separate clips stitched together.
When to Use It
Cinematic slow-motion for action shots, speed ramps in travel or sports montages, beat-synced speed changes in music videos, and emphasizing a highlight moment in gaming clips — anywhere a flat speed change would feel too uniform for what the moment calls for.
Adding Velocity on Mobile
- Open CapCut, start or open a project, and import your video.
- Select the clip → tap Speed in the bottom toolbar.
- Choose Curve (CapCut’s velocity mode, distinct from a flat speed setting).
- Pick a preset — Montage, Hero, Bullet, Jump Cut, Flash In/Out — or choose Custom for full manual control.
- If using Custom: you’ll see adjustable points on a graph. Drag a point up to speed up that section, down to slow it down. Play back and adjust until the transitions between speeds feel smooth rather than abrupt.
- Confirm to apply, then export.
Adding Velocity on Desktop
- Import your video and drag the clip to the timeline.
- Right-click the clip → Speed → Curve.
- Choose a preset or Custom, and adjust graph points the same way as mobile.
- Preview in real time before saving — desktop’s larger view makes it easier to judge whether a curve transition looks natural.
- Confirm to save.
Adding Velocity on CapCut Web
- Log in and import your video.
- Select the clip → Speed → Curve.
- Adjust preset curves or build a custom one.
- Save and export.
Getting Better Results
Shoot at a higher frame rate if you know you’ll want slow-motion sections. 60fps (or higher) source footage stays visually sharp when slowed down; 30fps footage slowed significantly tends to look choppy or stuttery, since there’s simply less captured motion data to work with.
Keep curve transitions smooth, not abrupt, unless a hard jump-cut in speed is specifically the effect you’re going for (this is what the “Jump Cut” preset is built for). A gradual curve reads as more cinematic; an unintentionally jagged one reads as a mistake.
Preview before exporting — a velocity curve that looks right on the graph can still feel off in actual playback, since it’s genuinely hard to judge pacing from a static curve view alone.
Common Problems
| Problem | Cause | Fix |
|---|---|---|
| Slow motion looks choppy | Source footage frame rate too low for the amount of slow-down applied | Shoot at 60-120fps for anything you know will be slowed significantly |
| The velocity effect barely reads as different | Curve variation too subtle | Increase the difference between fast and slow points on the graph |
| Audio goes out of sync after applying velocity | Speed changes affect the attached audio by default | Detach the audio track and adjust its timing/speed separately from the video |