
CapCut for Gaming Montages: Complete Editing Guide
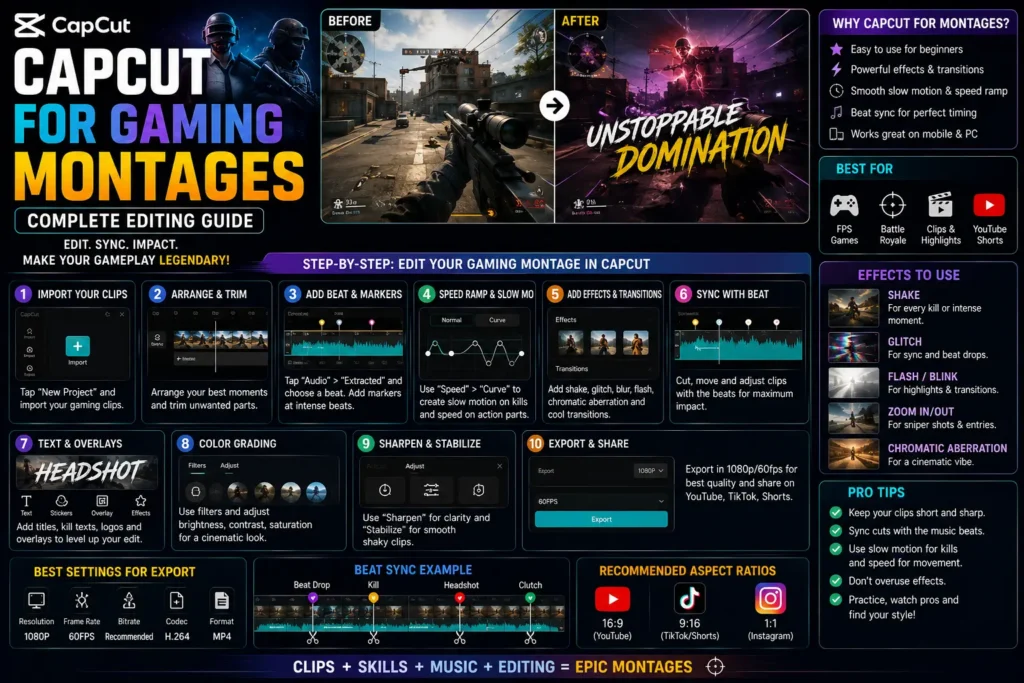
Gaming montages have become one of the most exciting and expressive forms of content in the digital era. Whether you’re showcasing epic kills, hilarious fails, or clutch victories, a well-edited montage can turn ordinary gameplay into cinematic entertainment.
If you’ve ever wondered how top creators make their videos so engaging, the answer often lies in powerful yet beginner-friendly editing tools — and CapCut is one of the best options out there.
Why CapCut is Perfect for Gaming Montages
CapCut has quickly become a favorite among gamers and video editors, and for good reason.
- Free and cross-platform: Available on both desktop (Windows/Mac) and mobile.
- Powerful features: Supports advanced tools like keyframes, speed control, overlays, transitions, and chroma key for facecam videos.
- Optimized for social media: Easily set video aspect ratios for YouTube, TikTok, or Instagram.
- User-friendly interface: Even beginners can produce professional-looking edits in hours instead of days.
While traditional editors like Adobe Premiere Pro or After Effects are powerful, they can be overwhelming and costly. CapCut offers a streamlined, accessible solution that can achieve cinematic results without a learning curve.
1. Plan Your Montage Before Editing
Great montages don’t start in the editor — they start with planning. The more organized you are before editing, the smoother the process becomes.
Define Your Style and Audience
Ask yourself:
- What’s your goal? (Show skill, tell a story, or make people laugh?)
- What platform will you post on? (TikTok favors fast vertical videos, YouTube works better for longer cinematic edits.)
- What’s your mood or theme? (Epic, humorous, competitive, or cinematic?)
A clear vision ensures your editing style matches your audience’s expectations.
Collect Quality Footage
- Record in 1080p or 4K with at least 60 fps for smoother slow-motion effects.
- Capture key moments: kills, combos, wins, or funny fails.
- Keep background noise low and game sound clear.
- If you use a facecam, record it separately in high quality.
Create a Basic Storyboard
Outline your video’s flow:
- Intro: Short, with your logo or name.
- Highlights: Core gameplay moments.
- Climax: Your best performance or funniest moment.
- Outro: Call to action (“Subscribe for more!”).
2. Setting Up CapCut for Gaming Projects
Start a New Project
- Launch CapCut and choose your aspect ratio:
- YouTube: 16:9 (1920×1080)
- TikTok/Reels: 9:16 (1080×1920)
- Import all assets — gameplay footage, facecam, music, and sound effects.
Organize Your Files
Rename your clips to identify moments easily (like “Headshot_1”, “ClutchWin”). Place your background music first if you plan to sync visuals with beats.
3. Core Editing: Trim, Split, and Arrange
Editing is about rhythm and flow. Keep only what adds value.
Trim Unnecessary Footage
Remove dull moments, pauses, and loading screens. The goal is to keep your montage fast-paced and exciting.
Split and Rearrange Clips
Use CapCut’s split tool to cut your footage right before and after key actions. Reorder them to create a smooth story — building tension toward your biggest highlight.
Maintain Pacing
Mix short clips for action and slightly longer ones for reactions. Use slow motion for epic moments and speed-ups for less critical sequences.
4. Adding Style: Effects, Transitions, and Keyframes
Once your basic structure is ready, add creativity and motion to make your montage stand out.
Speed Ramping and Time Remapping
CapCut’s Speed feature lets you slow down or speed up footage dynamically. Use this to:
- Slow the moment of a perfect shot.
- Speed up transitions between fights.
- Create smooth ramping effects for a cinematic look.
Keyframes and Camera Movement
Keyframes help animate zooms and pans — essential for professional motion.
- Zoom in slightly on kills or funny moments.
- Add a slow pan across scenery or scoreboard.
- Combine keyframes with opacity for fade-ins and fade-outs.
Transitions
Transitions tie clips together seamlessly:
- Zoom transitions or motion blur add flow.
- Flash or glitch effects build excitement.
- Avoid using too many — keep them consistent with your montage style.
Overlays and Chroma Key
Want to include your facecam? Import it as an overlay and remove the green background using Chroma Key.
You can also add overlays like kill counters, game stats, or animated graphics to emphasize moments.
5. Sound: The Secret Weapon of a Great Montage
Visuals grab attention, but sound keeps viewers hooked.
Music Selection
Choose royalty-free music that fits your montage’s tempo. Epic or electronic tracks work well for competitive clips; lo-fi beats suit funny or casual edits.
Align your major kills, cuts, or transitions on the beat for satisfying rhythm. CapCut’s waveform helps you spot beat peaks visually.
Sound Effects
Add subtle sound effects to enhance emotion:
- “Whoosh” or “punch” sounds for transitions.
- Impact hits on kill moments.
- Applause or voice-over for humor or reactions.
Audio Mixing
Balance your audio:
- Lower background music during speech.
- Keep game sounds audible but not overpowering.
- CapCut allows you to adjust audio levels per track easily.
6. Text, Branding, and Visual Identity
Your montage represents your personal brand.
Add Dynamic Text
Use animated text for:
- Player names, kill counts, or game titles.
- Call-to-actions like “Subscribe!” or “Follow for More!”
- Match fonts and colors to your gaming theme.
Build a Consistent Brand
Keep your intro short (under 5 seconds). Add an outro showing your logo or social handles. Consistency helps viewers remember your channel.
Thumbnail & Hooks
For YouTube, design eye-catching thumbnails using bright images and readable text.
For TikTok, your first few seconds act as the hook — make them explosive.
7. Exporting the Final Montage
Once you’re satisfied, it’s time to export.
Export Settings
- YouTube: 1080p or 1440p, 60 fps, H.264 codec.
- TikTok/Reels: 1080×1920, 60 fps.
- Set bitrate high for sharp details.
Upload Optimization
- Use keywords like “gaming montage,” “epic kills,” and your game name in title and description.
- Add hashtags (#GamingMontage, #CapCutEdit, #YourGameName).
- Ensure your video’s first frame is engaging — it can act as your TikTok preview.
8. Common Mistakes to Avoid
Even experienced editors slip up. Here are common pitfalls — and how to prevent them:
| Mistake | Fix |
|---|---|
| Overusing flashy transitions | Limit to 2–3 consistent styles |
| Music too loud or off-beat | Use waveform to sync and mix audio |
| Long intros | Keep under 5 seconds |
| Ignoring aspect ratio safe zones | Keep important visuals centered |
| Using copyrighted music | Always use royalty-free or licensed tracks |
9. Advanced Tricks for Pro-Level Montages
Want to make your montages look like the pros? Try these advanced techniques:
- Match cuts to beats: Time your transitions precisely to musical drops.
- Color grading: Apply LUTs or filters for a unified tone.
- Camera shake: Add mild shake during explosions or kills for intensity.
- Split-screen or PiP: Show multiple perspectives — e.g., your POV and opponent’s replay.
- Story-driven edits: Start with calm gameplay, build to chaos, end on a win.
If you’re creating content for short-form platforms, try vertical split screens — showing your gameplay and facecam together. It increases engagement dramatically.
10. Growing Your Channel with Montages
Editing is just the first step — now it’s time to build trust and community.
- Post consistently: Regular uploads train the algorithm and your audience.
- Engage viewers: Ask for comments, challenges, or reactions.
- Collaborate: Feature other gamers or creators.
- Focus on authenticity: Be yourself — audiences connect with genuine reactions.
- Use analytics: Track which montages perform best and refine your content style.
Remember, the goal is not just viral views but loyal followers who enjoy your editing craft.
Conclusion
CapCut has made professional-looking gaming montages accessible to everyone — no expensive software or editing degree required.
By combining creative planning, dynamic effects, sound syncing, and a clear sense of storytelling, you can transform ordinary clips into captivating cinematic moments.
Whether you’re editing intense PUBG kills, Free Fire highlights, or Valorant clutch moments, this guide gives you every step needed to polish your montage from start to finish.
Take your next gameplay session, import it into CapCut, follow these strategies, and watch your montages reach a whole new level of professionalism.


