
🎵 How to Sync Video Cuts and Effects to the Beat of Music in CapCut (Complete Guide)
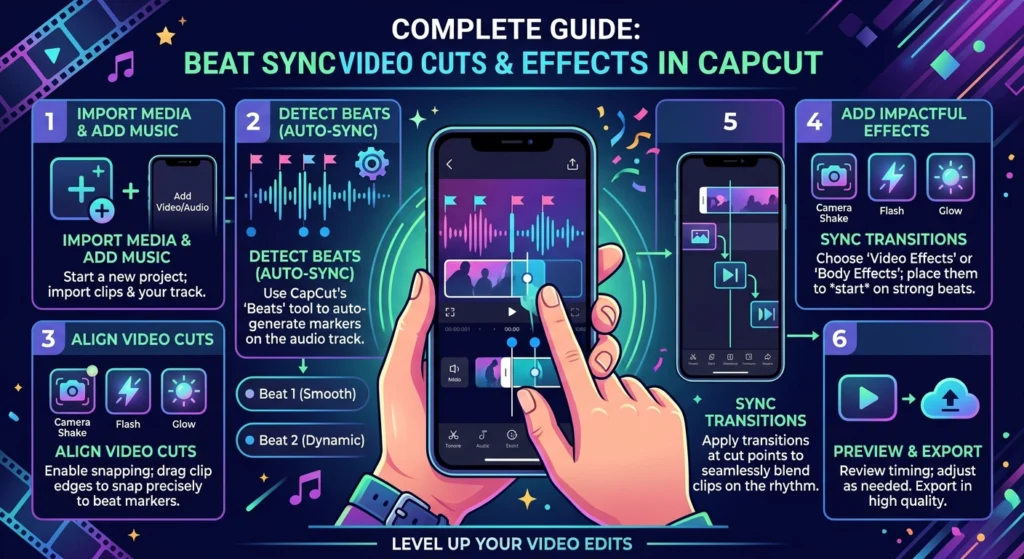
If you’ve ever seen an edit where clips change exactly on every drum hit or beat drop — that’s called beat synchronization. It’s what makes reels, music edits, and montages feel so powerful and satisfying.
The good news? You don’t need professional editing software like Premiere Pro to achieve this effect — you can sync clips and effects perfectly to music beats in CapCut, right from your phone or PC.
In this guide, you’ll learn how to match cuts, transitions, and effects to a song’s rhythm and make your edits visually dynamic.
🎧 Why Beat Syncing Matters in Video Editing
Beat synchronization connects visual rhythm to audio rhythm — which is why viewers feel more engaged when scenes change on-beat.
When done right:
- Your video feels energetic and cinematic.
- Viewers stay hooked longer.
- You boost the chance of going viral on TikTok, Reels, or Shorts.
CapCut offers built-in tools for beat detection, markers, and auto-sync that simplify the entire process.
⚙️ Method 1: Manually Syncing Clips to Beats in CapCut
Step 1 – Import Music
- Open CapCut Latest version → New Project.
- Tap Audio → Sounds → From Device and import your track.
Step 2 – Visualize Beats
- Tap the audio track → enable Beat Detection (if available).
- CapCut automatically places beat markers (white dots) across the timeline.
If not, you can tap the “Beat” button manually while the music plays to add markers yourself.
Step 3 – Add Your Clips
- Import multiple clips to the timeline.
- Adjust each clip’s start and end point so that cuts happen exactly on the markers.
Step 4 – Fine-Tune Timing
- Zoom in on the timeline for precise cuts.
- Make sure transitions or visual hits align with drum kicks or snares.
Step 5 – Add Effects on Beats
- Select a clip → Effects → Video Effects.
- Choose light flashes, camera shakes, or blur effects.
- Trim and place them right at the beat marker for maximum impact.
⚙️ Method 2: Auto Beat Sync Feature in CapCut
CapCut’s Auto Beat Sync tool can automatically cut your clips to the rhythm of a selected music track.
Step 1 – Select “Auto Sync”
- On the project home screen, tap Auto Captions/Sync or look under Templates → Beat Sync.
Step 2 – Choose Music
- Pick any song from CapCut’s built-in library or import your own.
Step 3 – Import Clips
- Add multiple clips — CapCut automatically arranges them to match the beat drops.
Step 4 – Adjust Transitions & Filters
- Review the auto-synced version.
- Manually tweak clip timing or transition speed for better accuracy.
This is great for quick edits like photo montages, travel reels, and social media highlights.
🪄 Pro Tips for Perfect Beat Syncing
✅ Use Sound Waves – CapCut’s timeline shows waveform patterns — align cuts with spikes for perfect sync.
✅ Cut on Strong Beats – Transitions feel natural when they land on main beats (1, 2, 3, 4).
✅ Add Flash Effects or Zooms – Highlight beat drops with quick zooms, flash transitions, or shakes.
✅ Use Velocity Ramps – Combine speed ramping with beat sync for cinematic flow.
✅ Watch and Adjust Repeatedly – A good beat sync edit often needs minor millisecond tweaks.
🎬 Creative Examples
- Dance Edits: Match every move or pose with a strong beat.
- Gaming Montages: Trigger slow-motion or flash when you score a kill or victory.
- Travel Reels: Time cuts to beat drops for a thrilling vibe.
- Product Promos: Sync transitions to the rhythm to make ads feel modern and energetic.
⚠️ Common Mistakes to Avoid
🚫 Randomly cutting clips without considering the music’s rhythm.
🚫 Using tracks with inconsistent or weak beats (makes syncing harder).
🚫 Overloading too many effects that overshadow the beat itself.
🚫 Forgetting to preview in full volume or final resolution.
🧩 Bonus: Best CapCut Templates for Beat Syncing
CapCut has hundreds of ready-to-use templates with built-in beat sync timing — you only need to add your clips.
🏁 Conclusion
Beat syncing is the secret ingredient behind every smooth, satisfying CapCut edit. By mastering this technique — whether manually or with auto-sync — you can make your videos more engaging, rhythmic, and professional.
Start with simple clips, feel the rhythm of your soundtrack, and let CapCut do the heavy lifting. Once you get comfortable syncing to the beat, your edits will instantly stand out in any feed.
✅ Key Takeaway:
“Good visuals catch attention — but syncing them perfectly to the beat makes viewers remember your edit.”


