
How to Create Ink Splash Edit in CapCut (Step-by-Step Guide)
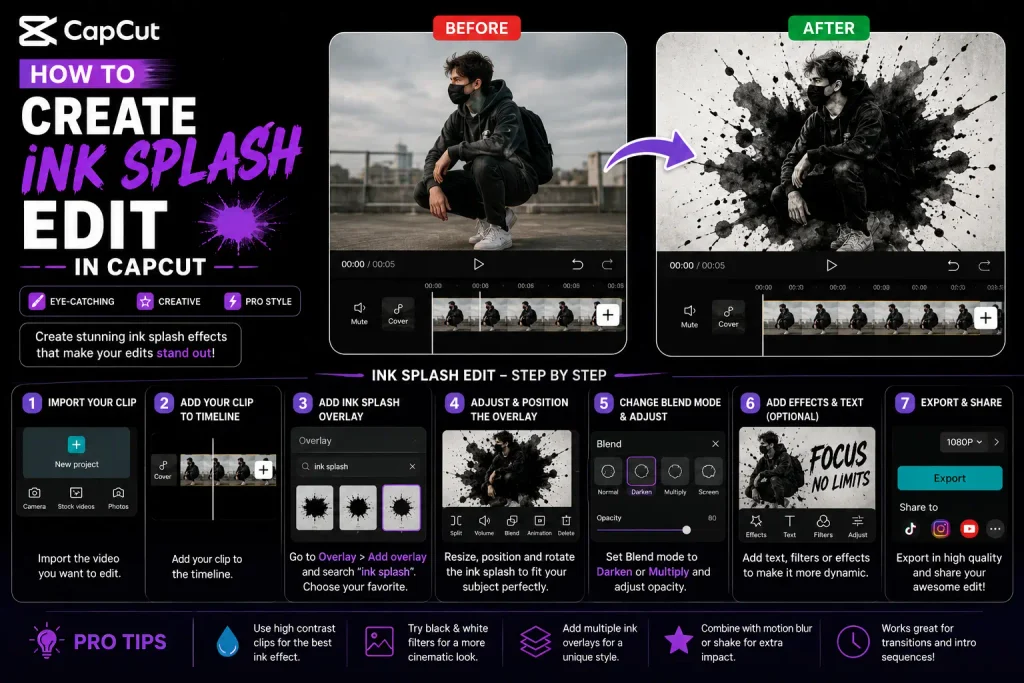
An ink splash edit in CapCut — where a spreading splatter of ink or paint reveals the next clip, a title, or a lyric line — is a striking, artistic transition that’s become common in lyric edits, character intros, and fashion-style reels. It’s fully achievable in CapCut using overlay and blend tools, no dedicated compositing software needed.
What This Effect Involves
Ink or paint spreads across the screen to reveal a photo, video, or text underneath, usually paired with high-contrast visuals (black, white, or red tones read particularly well), smooth beat-synced transitions, and bold typography if you’re revealing lyrics or a title. It’s a relatively simple effect to build, but it reads as noticeably more polished and cinematic than a standard cut or fade.
What You’ll Need
The latest version of CapCut, your main clip or image (portrait or cinematic framing both work), an ink splash overlay asset (MP4 or PNG, in black, white, or a color that fits your edit), a music track with a clear beat to sync to, and a font in mind if you’re revealing text or lyrics. Optional extras include grunge or watercolor textures, colored light overlays, and background blur or vignette filters.
Step-by-Step Guide
1. Start a new project. Open CapCut, tap New Project, and import your main clip or image. A solid dark background layer underneath can help the ink effect read with more contrast.
2. Add the ink splash overlay. Go to Overlay → Add Overlay and select your ink splash file. Resize it to fill the screen, and position it on the timeline at the exact point you want the ink to appear.
3. Blend the ink layer in. Select the ink splash layer and open its blend settings — Screen, Overlay, or Lighten modes tend to work well for lighter or white ink on a darker background. Adjust opacity to taste, generally somewhere in the 60–90% range depending on how strong you want the effect. For black ink specifically, Darken or Multiply blend modes tend to work better than the lighter blend options.
4. Reveal your clip or text. For a video reveal: place your next clip on a layer beneath the ink splash so the ink animation appears to wipe it into view. For a text reveal: add your title or lyric text on top of the splash, using a bold display font — look for something in the style of Anton, Bebas Neue, or Oswald in CapCut’s font library, or import one if it’s not available — and animate it with a fade-in or a pop timed to when the ink spreads.
5. Sync to music. Import your track, find the strong beats (using CapCut’s beat markers if available), and align the start of the ink splash animation with a beat drop specifically. Adjust surrounding transitions so the whole sequence feels rhythmic rather than just visually correct.
6. Add finishing filters. A subtle filter — retro, moody, or a black-and-white film look — paired with adjusted brightness, contrast, and saturation helps push the cinematic tone further. A touch of film grain or vignette can add extra depth if it fits the edit.
7. Export. 1080p at 60fps holds up well for this kind of detail-heavy, fast-moving effect. Preview the whole thing before posting to make sure text and ink timing actually land the way you intended, and consider using a mid-splash frame as your thumbnail — it tends to grab attention better than a static “before” or “after” frame.
Pro Tips
High-quality overlay assets with genuinely transparent backgrounds make a noticeable difference over lower-resolution ones. Keeping the background simple lets the ink effect itself stand out rather than competing with a busy scene. Syncing every element — overlay, text, transition — tightly to the beat matters more than any individual visual choice. And previewing on an actual phone screen before posting catches timing and clarity issues that are easy to miss on a larger editing display.
Common Mistakes to Avoid
Low-resolution overlay assets tend to look blurry or pixelated once scaled up, undercutting the whole effect. Poor timing — an ink splash that doesn’t actually land on the beat drop — is one of the most common things that makes this effect feel off rather than polished. Overusing filters can end up muting or hiding the ink animation itself. And text set too small, or in a color too close to the ink overlay, tends to get lost right when it should be the focal point.


